How to Bend Pipe Without a Bender: 5 DIY Methods (And When to Upgrade to a Real Tool)
Yes, you can bend pipe without a bender — but every DIY method comes with a hard ceiling on precision, safety, and repeatability. The five practical approaches are sand packing (fill the pipe with dry sand to prevent collapse), heat bending (apply a torch to soften the bend zone), wood jig bending (use a carved wooden form as a crude die), hydraulic jack against fixed anchors (brute-force leverage for thick-walled steel), and internal spring bending (insert a torsion spring to keep the cross-section round). Each works for a narrow range of materials and bend angles. But once you need consistent angles, multiple identical parts, or bends in pipe thicker than Schedule 40, DIY methods will cost you more in scrapped material and lost time than a real bender. We call this crossover point the DIY-to-Pro Upgrade Threshold — and after 15+ years of manufacturing bending equipment at TubeFab Tech, we’ve seen thousands of fabricators hit it.
1. Method 1: Sand Packing (Sand Filling Method)
How It Works
Sand packing is the oldest DIY pipe bending technique in existence. The principle is simple: fill the pipe completely with tightly packed dry sand, cap both ends, then bend the pipe over a fixed radius form. The sand acts as an internal mandrel — it resists compression from the pipe wall and prevents the cross-section from ovalizing or collapsing inward.
Step-by-Step
- Weld or plug one end of the pipe securely.
- Fill the pipe with fine, completely dry sand. Tamp it continuously with a rod as you fill — loose sand offers almost no support. The sand must be bone-dry; any moisture turns to steam if you heat the pipe later and can blow the caps off.
- Cap the open end by welding or using a tight-fitting plug.
- Mark your bend center and anchor the pipe against a fixed radius form — a tree stump with a groove, a steel pipe welded to a plate, or a heavy vise with a rounded jaw.
- Apply slow, even force to bend the pipe around the form. Check the angle frequently with a protractor.
- Cut open the caps and pour out the sand when finished.
Limitations
- No precision control. The bend radius depends entirely on the form you’re bending against. Expect ±5–10 mm tolerance at best.
- Labor-intensive. Filling, tamping, and cleaning sand from a 3-meter pipe takes 30–45 minutes per piece.
- Single-bend only. Making a second bend on the same pipe means re-packing sand, which is impractical for multi-bend parts.
- Material waste. Without a proper die, thin-walled pipe still kinks at bend angles above 30 degrees even with sand.
Real customer scenario: Mark D., a fence contractor in Ohio, tried sand packing on 1-1/2″ Sch 40 steel pipe (48.3 mm OD) for a custom railing job. He spent two hours packing sand into 12 sections, bent them over a section of larger pipe welded to his workbench, and got usable bends on only 7 of the 12. Three kinked past 45 degrees, and two had visible ovalization that failed his client’s inspection. His material scrap rate was 42%, and his effective labor cost per finished bend came to $8.50 — compared to $0.60 per bend on the VB-38 electric bender he eventually purchased from us.
2. Method 2: Heat Bending (Torch Method)
How It Works
Heat bending uses a propane or oxy-acetylene torch to heat the bend zone of the pipe to a cherry-red temperature (approximately 900–1100°C for mild steel). At this temperature, the yield strength drops dramatically — steel that resists bending at room temperature becomes plastic and can be formed by hand or with a lever. The key is heating an even band around the full circumference of the pipe, not just one side.
Step-by-Step
- Secure the pipe in a heavy vise or anchor it to a solid fixture.
- Mark the bend zone — typically 4–6 pipe diameters in length.
- Heat the bend zone evenly with a rosebud torch tip, moving constantly to avoid hot spots. The metal should glow a uniform cherry red.
- Apply bending force using a lever arm (a longer pipe slipped over the workpiece) or a chain winch anchored to a fixed point.
- Hold the angle for a few seconds, then let the pipe air-cool. Do not quench — rapid cooling hardens steel and makes it brittle.
- Reheat and adjust if the angle isn’t reached on the first pass.
Limitations and Safety Risks
- Fire and burn hazard. You’re working with an open flame at 1000°C+. Leather gloves, face shields, and a fire extinguisher are mandatory. Sparks can travel 3+ meters.
- Heat-affected zone (HAZ) weakness. Heating steel above its transformation temperature alters its grain structure. The bend zone becomes softer in mild steel or hardened and brittle in higher-carbon steels. This is a structural integrity issue for load-bearing applications.
- Scale and surface damage. Oxidation at high temperature produces scale that flakes off, leaving a rough, pitted surface that requires grinding.
- Inconsistent results. Without temperature measurement (infrared pyrometer), you’re guessing. Underheat and the pipe kinks; overheat and the wall thins excessively on the outside radius.
- Not suitable for galvanized pipe. Heating galvanized steel vaporizes the zinc coating, releasing toxic zinc oxide fumes. This is a serious health hazard requiring respiratory protection.
Real customer scenario: A fabrication shop in Queensland, Australia was heat-bending 1″ Sch 40 black steel pipe for agricultural equipment frames. Their process used an oxy-acetylene torch with a #4 rosebud tip, bending around a 300 mm radius steel form anchored to the floor. They produced acceptable bends at a rate of 8 per hour. However, three incidents changed their approach: (1) a worker received second-degree burns on his forearm from a flashback, (2) a batch of 40 bends failed magnetic particle inspection due to micro-cracks in the HAZ, and (3) their workers’ compensation insurance premium increased by 18% after the burn incident was filed. They switched to a TubeFab Tech VB-38 electric bender, eliminated open-flame bending entirely, and their insurance broker negotiated a 12% premium reduction based on the improved safety profile.
3. Method 3: Wood Template Jig Method
How It Works
This method replicates the principle of a die-based bender using wood. You cut a curved groove into a thick hardwood block (oak, maple, or beech) that matches the pipe’s outside diameter and desired bend radius. The pipe is then pressed or pulled into the groove, which guides the bend and provides partial support against ovalization.
Step-by-Step
- Select hardwood at least 50 mm thick — oak or maple works best. Avoid softwoods; they compress under bending load and lose their groove shape after a few bends.
- Cut the groove using a router with a core box bit matched to your pipe OD. The groove depth should be at least half the pipe diameter.
- Cut the outer radius form to your desired bend angle using a bandsaw or jigsaw.
- Clamp the jig securely to a workbench.
- Lubricate the groove with wax or oil to reduce friction.
- Press the pipe into the groove using a come-along, ratchet strap, or hydraulic press. Work slowly and check the angle frequently.
Limitations
- Wood compresses and wears. After 5–10 bends in hardwood, the groove widens and loses its shape. The pipe starts to sit loosely, and ovalization increases with each subsequent bend.
- Fixed radius only. Each jig is cut to one specific radius and pipe size. Need three different radii? Build three jigs.
- No clamping system. Unlike a real bender with a clamp die, the pipe can slip out of the groove mid-bend, causing injury or ruining the part.
- Low force capacity. Wood jigs work for thin-walled copper, aluminum, and mild steel up to about 25 mm OD. Anything thicker requires forces that will split the wood.
Real customer scenario: Elena R., a custom furniture maker in Lisbon, Portugal, builds industrial-style lighting fixtures from 22 mm OD mild steel tube. She cut a wood jig from 60 mm oak using a 22 mm core box router bit, with a 150 mm bend radius for 90-degree lamp arm bends. Her first jig produced 8 clean bends before the groove widened by 0.8 mm — enough to cause visible ovalization on bend #9. She recut the jig and got another 7 bends before the same degradation. At €45 per oak blank plus 2 hours of machining time, her jig cost per bend was €3.80. After her fourth jig, she contacted TubeFab Tech and purchased the VB-38. Her cost per bend dropped to under €0.50, and she now produces 60+ identical lamp arms per day with zero ovalization.
4. Method 4: Hydraulic Jack Against Fixed Anchors
How It Works
This is the brute-force approach. You anchor the pipe at two points (using heavy-duty clamps, welded stops, or a pair of chain vices), then use a hydraulic bottle jack or shop press to push the pipe at the midpoint between the anchors. The pipe bends around the jack’s contact point. This is essentially a manual version of ram bending — the same principle used in commercial hydraulic pipe benders, but without precision dies or controlled ram travel.
Step-by-Step
- Anchor two fixed points — steel posts welded to a heavy plate, or a pair of chain vices bolted to the floor.
- Position the pipe between the anchors at the desired bend location.
- Place a hydraulic bottle jack (10–20 ton capacity) under the pipe at the bend midpoint.
- Pump the jack slowly. The pipe lifts off the ground and bends against the two anchor points.
- Place a contoured block (wood or steel with a matching radius groove) between the jack ram and the pipe to distribute force and reduce denting.
- Check the angle with a protractor after every few pumps. Hydraulic force is not reversible — once you overshoot, you can’t unbend.
Limitations
- Severe ovalization. Ram bending without a proper forming die flattens the pipe at the contact point. The cross-section can deform by 15–20% — unacceptable for any application requiring flow capacity or visual quality.
- No radius control. The bend radius is determined by the distance between anchor points, not by a die. You get a wide, gradual curve — not a tight, precise radius.
- Over-bend risk. Hydraulic jacks apply force faster than you can react. Overshoot by 5 degrees and the part is scrap. There’s no springback compensation.
- Anchor failure danger. If an anchor slips under 10+ tons of hydraulic force, the pipe can launch across the shop. This method causes more workshop injuries than any other DIY bending technique.
Real customer scenario: A motorsport fabrication shop in Birmingham, UK was using a 12-ton hydraulic bottle jack between two RSJ steel beams embedded in their shop floor to bend 33.7 mm OD × 3.2 mm WT steel tube for roll cage hoops. Their process: position tube, place shaped hardwood block on jack ram, pump to 90 degrees, account for 3-degree springback. They achieved a bend rate of about 6 per hour. However, their rejection rate was 23% — primarily due to ovalization exceeding their 5% tolerance limit (measured with a digital caliper at the bend apex). One anchor slipped during a bend and the tube shot across the shop, denting a vehicle body panel. After switching to the TubeFab Tech VB-38 with proper dies, their rejection rate dropped to under 2%, ovalization fell to under 2%, and they eliminated the anchor-slip safety risk entirely.
5. Method 5: Internal Spring Bending
How It Works
An internal bending spring is a tightly coiled torsion spring that fits snugly inside the pipe at the bend zone. The spring’s coil structure resists inward compression, keeping the pipe cross-section round during the bend. The pipe is then bent by hand or over a form, with the spring providing internal support similar to a mandrel — but far less effectively.
Step-by-Step
- Select the correct spring size — it must match the inside diameter of your pipe closely. A loose spring provides no support; a tight spring won’t insert.
- Insert the spring into the pipe and position it at the bend center. For long pipes, attach a string to the spring to pull it into position and retrieve it after bending.
- Bend the pipe by hand or over a rounded form. The spring prevents the most severe collapse but does not eliminate ovalization entirely.
- Remove the spring by pulling the string or tapping the pipe to slide it out.
- Inspect the bend for ovalization — internal springs typically allow 5–8% deformation.
Limitations
- Small pipe only. Internal springs are only manufactured for pipe sizes up to about 25 mm (1 inch) OD. For larger pipe, no commercial spring exists.
- Soft materials only. Springs work on copper, aluminum, and thin-walled mild steel. They cannot resist the bending forces needed for Schedule 40+ steel pipe.
- Limited bend angle. Beyond 45 degrees, the spring itself deforms and can become permanently stuck inside the pipe — a costly extraction problem.
- No radius control. The spring supports the cross-section but does nothing to control the bend radius. You still need an external form.
- Spring retrieval failures. If the spring deforms during bending, it can jam inside the pipe. Extraction often requires cutting the pipe open — destroying the part you just bent.
Real customer scenario: Tom K., a plumber in Auckland, New Zealand, uses internal springs for bending 15 mm and 22 mm copper tube on residential plumbing installations. His springs cost NZ$12 each and last about 200 bends before the coils fatigue. He successfully bends 90% of his copper tube this way. However, when he took on a commercial job requiring 34 mm steel pipe bends for a handrail system, he discovered no commercial internal spring exists for that size. He tried heat bending, kinked two sections, and ultimately ordered a TubeFab Tech VB-38. He now uses the VB-38 for all steel pipe work while still using springs for small copper tube — a hybrid approach we see frequently among tradespeople who handle multiple material types.
6. DIY Methods vs Professional Pipe Bender: Comparison Table
| Criteria | Sand Packing | Heat Bending | Wood Jig | Hydraulic Jack | Internal Spring | Professional Bender (VB-38) |
|---|---|---|---|---|---|---|
| Bend Precision | ±5–10 mm | ±3–8 mm | ±2–5 mm | ±5–15 mm | ±3–6 mm | ±0.5 mm |
| Speed (bends/hour) | 2–3 | 6–8 | 4–6 | 5–7 | 8–12 | 40–60 |
| Safety Risk | Low | High (fire/burns) | Low–Medium | High (anchor failure) | Low | Very Low |
| Max Pipe OD | 50 mm | 60 mm | 25 mm | 50 mm | 25 mm | 38 mm |
| Ovalization | 5–10% | 8–15% | 5–8% | 15–20% | 5–8% | <2% |
| Repeatability | Poor | Poor | Fair (until jig wears) | Poor | Fair | Excellent |
| Material Waste Rate | 30–42% | 20–35% | 15–25% | 20–30% | 10–20% | <2% |
| Cost Per Bend | $4–8 | $3–6 | $2–4 | $2–5 | $0.50–1.50 | $0.50–0.80 |
| Multi-Bend Parts | No | Limited | No | No | Limited | Yes |
| Initial Cost | $20–50 | $80–200 | $50–100 | $100–300 | $10–30 | $450 |
7. The DIY-to-Pro Upgrade Threshold: Knowing When to Stop DIY-ing
After analyzing hundreds of customer workflows at TubeFab Tech, we’ve identified a consistent pattern. We call it the DIY-to-Pro Upgrade Threshold — the point at which the hidden costs of DIY bending exceed the cost of owning a professional machine.
The threshold is crossed when any two of the following conditions are true:
- Volume trigger: You need more than 10 bends per week on a regular basis.
- Precision trigger: Your application requires bend tolerance tighter than ±2 mm.
- Material trigger: You’re bending Schedule 40 steel pipe or thicker, in diameters above 25 mm.
- Repeatability trigger: You need multiple identical parts — the 5th part must match the 1st.
- Safety trigger: Your bending process involves open flames, hydraulic force over 5 tons, or any setup where anchors can fail.
- Scrap rate trigger: Your material waste rate exceeds 15% of total material consumed.
- Multi-bend trigger: Your parts require two or more bends on the same workpiece.
Here’s the math that makes the decision obvious. Take a typical small fabrication job: 30 handrail sections, each with two 90-degree bends in 1″ Sch 40 steel pipe.
| Cost Factor | DIY (Sand Packing) | VB-38 Electric Bender |
|---|---|---|
| Material (60 sections × $4.20) | $252 | $252 |
| Scrap rate | 35% = $88 wasted | 2% = $5 wasted |
| Labor (60 bends × time × $25/hr) | 60 × 35 min = 35 hrs = $875 | 60 × 1.5 min = 1.5 hrs = $37.50 |
| Equipment cost | $30 (sand + caps) | $450 (one-time) |
| Total for first job | $1,157 | $744.50 |
| Cost per bend | $19.28 | $12.42 |
The VB-38 pays for itself on the first job — and every subsequent job runs at a marginal cost of about $0.60 per bend versus $19 for sand packing. This is the DIY-to-Pro Upgrade Threshold in action: the crossover happens faster than most fabricators expect.
8. Product Recommendation: TubeFab Tech VB-38 Vertical Electric Pipe Bender
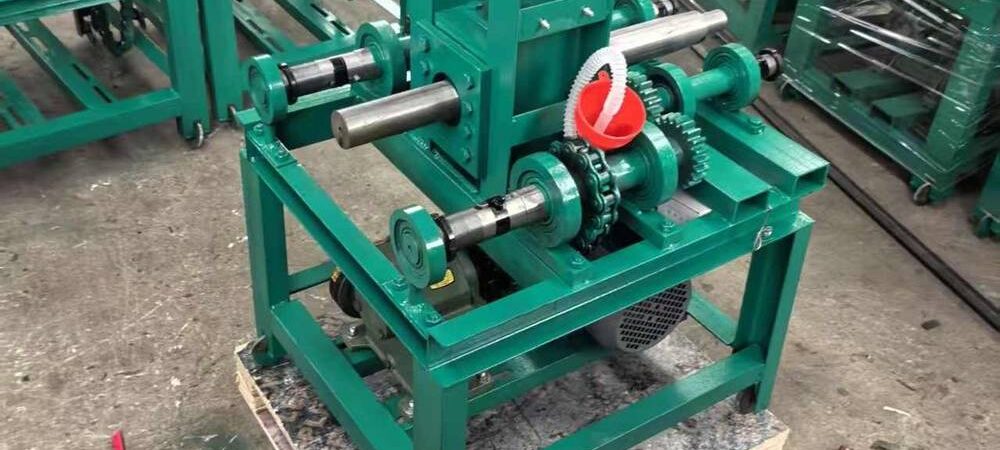
If you’ve hit the DIY-to-Pro Upgrade Threshold, the VB-38 Vertical Electric Pipe Bender is the most cost-effective entry point into professional bending — priced at just $450, which is less than the cost of scrapped material on a single mid-size DIY job.
Why the VB-38 Outperforms Every DIY Method
- Electric motor drive: Consistent torque on every bend — no hydraulic mess, no manual pumping, no flame. Just plug in and bend.
- Precision dies: Each die is machined to the exact pipe OD, eliminating the ovalization that plagues every DIY method. Expected tolerance: ±0.5 mm.
- Handles pipe up to 38 mm OD: Perfect for NPS 1″ (33.4 mm) and smaller pipe — the most common size in handrails, fencing, HVAC, and electrical conduit work.
- Repeatability: Set the angle stop once and every subsequent bend matches exactly. The 30th part is identical to the 1st.
- Vertical design: Saves floor space. The pipe stands upright during bending, making it easy to position and control.
- Safety: No open flame, no hydraulic jack that can slip, no sand to clean up. The VB-38 operates with the pipe fully enclosed in the die — hands stay clear of the bend zone.
VB-38 Specifications
| Specification | Value |
|---|---|
| Max Pipe OD | 38 mm |
| Drive Type | Electric motor |
| Bend Angle Range | 0–180° |
| Voltage | 110V/220V (configurable) |
| Weight | 85 kg |
| Price | $450 USD |
View the VB-38 product page for full specifications, die options, and ordering information.
Not sure if the VB-38 is right for your application? Contact TubeFab Tech — send us your material specs, pipe size, wall thickness, and bend requirements. We’ll confirm the right model and die setup within 24 hours.
9. Frequently Asked Questions
Can I bend steel pipe at home without any special equipment?
Yes, but with significant limitations. For thin-walled steel pipe (under 2 mm wall thickness) in small diameters (under 25 mm), the sand packing or internal spring methods can produce acceptable results for non-critical applications. For Schedule 40 steel pipe or larger diameters, DIY methods will produce high scrap rates (20–40%) and inconsistent results. If you need more than a few bends, a purpose-built bender like the VB-38 ($450) is more economical.
What is the easiest way to bend pipe without a machine?
For copper and aluminum tube, the internal spring method is the easiest — insert the spring, bend by hand over your knee or a rounded form, remove the spring. For steel pipe, sand packing is the most reliable DIY method, though it’s labor-intensive. The wood jig method is easiest if you already have woodworking tools and only need one specific bend radius repeated a few times.
How do you bend pipe without kinking it?
Kinking occurs when the pipe wall collapses inward during bending. To prevent it: (1) Use sand packing to provide internal support, (2) bend slowly and evenly around a form with a large enough radius (minimum 5× pipe OD), (3) never exceed 90 degrees in a single bend for thin-walled pipe, and (4) use an internal spring for small-diameter tube. Even with these precautions, DIY methods cannot fully prevent kinking on pipe with wall thickness under 2 mm. A proper bender with matched dies eliminates kinking entirely.
Is it worth buying a pipe bender for DIY projects?
If you do more than 10 pipe bends per year on steel pipe larger than 25 mm OD, yes. The math is straightforward: DIY methods produce 20–40% scrap and cost $4–8 per bend in labor and wasted material. A VB-38 at $450 with $0.60 per bend cost breaks even after approximately 75 bends — well within a single year for most hobbyist fabricators, and immediately for any small business. The added benefit of consistent, repeatable, safe bends makes the upgrade worthwhile even before the cost crossover.
Conclusion
You can bend pipe without a bender — but “can” and “should” are different words. The five DIY methods we’ve covered all work within narrow limits: sand packing is reliable but slow, heat bending is fast but dangerous, wood jigs are cheap but imprecise, hydraulic jacks are powerful but destructive to pipe geometry, and internal springs are handy but limited to small-diameter soft tube.
The DIY-to-Pro Upgrade Threshold isn’t about prestige — it’s about economics. When your volume, precision, material, or safety requirements cross any two of the seven triggers we’ve identified, continuing to DIY isn’t saving money. It’s costing you in scrap, labor, and risk.
The TubeFab Tech VB-38 at $450 is designed to be the bridge. It costs less than the material you’ll scrap on one mid-size DIY job, and it delivers professional-grade precision, repeatability, and safety from day one.
Contact TubeFab Tech today — tell us what you’re bending, and we’ll tell you straight whether a DIY method will work or whether it’s time to upgrade. No pressure, no upsell — just honest engineering advice from people who’ve been building bending equipment for 15+ years.